table of contents
How to Test and Replace Ball Joints on a Dana 50 or Dana 60 Axle (1980-1997 Ford F-Series)
Ball joints are crucial components in your 1980-1997 Ford F-series truck, especially if you're running a Dana 50 or Dana 60 axle. Over time, these ball joints can wear out, leading to poor handling, uneven tire wear, and unsafe driving conditions. If you're noticing steering problems or clunking noises from your front end, it might be time to test and replace your ball joints. In this guide, we’ll walk you through the process of testing and replacing ball joints on your Dana 50 or Dana 60 axle.
Signs of Worn Ball Joints
Before diving into testing and replacing your ball joints, here are a few symptoms that indicate they might be worn or failing:
- Uneven tire wear
- Loose or wandering steering
- Clunking or popping noises when turning
- Excessive play in the front wheels
- Vibrations at higher speeds
If you notice any of these issues, it’s a good idea to test your ball joints to see if they need replacement.
Tools You'll Need
- Ball joint press tool
- Jack and jack stands
- Socket set and ratchet
- Torque wrench
- Hammer and punch
- Pliers
- Ball joint separator (pickle fork)
- Grease gun (for new ball joints)
- New ball joints (specific to your Dana 50 or Dana 60 axle)
How to Test Ball Joints
1. Jack Up the Front End
Start by safely lifting the front of your truck. Use a jack to lift one side at a time and place jack stands under the frame to secure the vehicle.
2. Check for Vertical Play
With the front wheels off the ground, grab the top and bottom of the tire. Try to move it vertically, pushing at the top and pulling at the bottom, and then reverse. There should be minimal or no movement. If you feel excessive play, your ball joints might be worn.
3. Check for Horizontal Play
Next, grab the sides of the tire (9 o’clock and 3 o’clock positions) and try to move it back and forth. If there’s noticeable play, this could indicate bad tie rods, but in conjunction with vertical play, it's likely the ball joints.
4. Use a Pry Bar
To further check the ball joints, use a pry bar under the tire while lifting up slightly. If you see movement between the steering knuckle and the axle housing, it's a clear sign that the ball joints are worn out and need to be replaced.
How to Replace Ball Joints
If you’ve confirmed that your ball joints are bad, follow these steps to replace them.
1. Remove the Wheel and Hub Assembly
After securing your truck on jack stands, remove the front wheels. Then, remove the locking hub assembly by unscrewing the outer components of the hub. You’ll need to take off the brake caliper and rotor as well. Be sure to hang the caliper out of the way without putting stress on the brake line.
2. Remove the Tie Rod and Knuckle
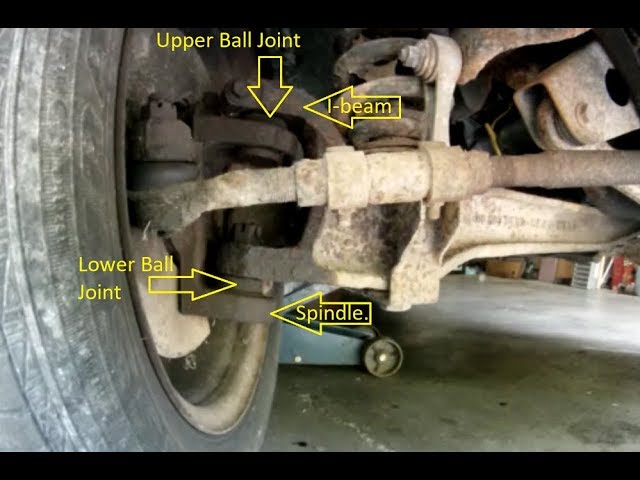
Disconnect the tie rod using a pickle fork or ball joint separator. Then, remove the axle shaft by pulling it out of the hub assembly. You will now need to remove the steering knuckle from the axle. This involves removing the nuts from the upper and lower ball joints.
3. Press Out the Old Ball Joints
With the knuckle off, use a ball joint press to remove the old ball joints. Place the press over the ball joint, and use your ratchet and socket to press the ball joint out of the knuckle. You may need to use a hammer or punch to loosen any stubborn ball joints.
4. Install the New Ball Joints
Insert the new ball joints into the knuckle. Use the ball joint press to carefully press the new ball joints into place. Make sure they are fully seated before moving on to the next step. Some ball joints come with grease fittings, so be sure to install those as well.
5. Reassemble the Knuckle and Hub
Reinstall the knuckle onto the axle by inserting the new ball joints into their respective holes. Tighten the ball joint nuts according to the manufacturer’s torque specifications (usually found in your truck’s service manual). Reconnect the tie rod, and then reinstall the axle shaft, hub, and wheel assembly.
6. Grease the Ball Joints
Once everything is back together, use a grease gun to fill the new ball joints with grease (if they have grease fittings). Make sure to follow the recommended maintenance intervals to keep your new ball joints in good condition.
7. Lower the Truck
Remove the jack stands and lower your truck back to the ground. Give everything a final check to ensure that everything is reassembled correctly.
Conclusion
Testing and replacing the ball joints on your Dana 50 or Dana 60 axle in a 1980-1997 Ford F-series truck is a vital part of maintaining your front suspension and ensuring safe driving. By following these steps, you can check for worn ball joints and replace them if necessary, improving your truck’s handling, stability, and overall performance. Keep an eye on regular maintenance to extend the life of your new ball joints and keep your truck running smoothly.


